Scorecard &
Course Guide
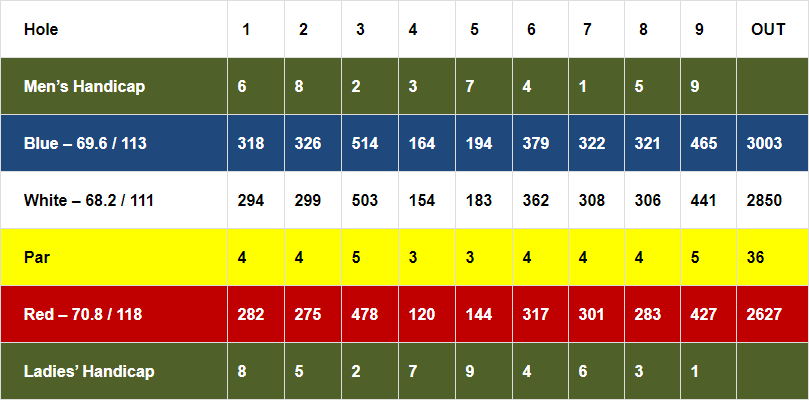
Scorecard
Course Guide
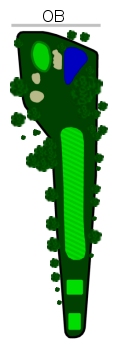
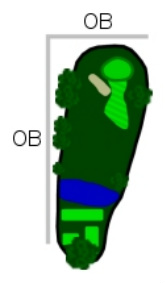
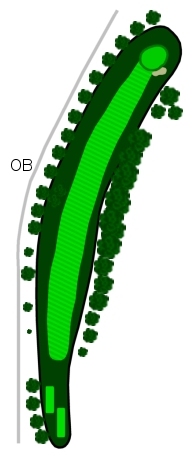
Hole #1
- Blue 318 Yards
- White 294 Yards
- Red 282 Yards
Pro-Play:
This is a great strategy hole.
Big hitters can reach the green (but also end up bunkered or in the water hazard right of the green)
The safest play is a long iron to the right side of the fairway. This will leave you a short wedge to an extreme back to front sloping green.
Stay below the hole on your approach shot. A 1ft downhill putt is not a gimme.
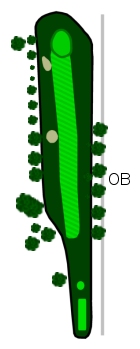
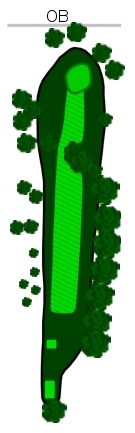
Hole #2
- Blue 326 Yards
- White 299 Yards
- Red 275 Yards
Pro-Play:
This is a great short yet tight hole.
There is OB very close along the right side and a bunker at the 100 yard marker.
The safe play is to lay back to around 115 yards. And hit a short iron into the green.
If you hit driver, it needs to be accurate.
On your approach shot, club up one club and swing smooth.
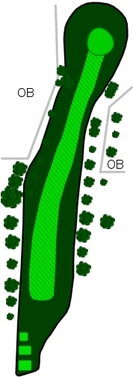
Hole #3
- Blue 514 Yards
- White 503 Yards
- Red 478 Yards
Pro-Play:
The first of the two par 5’s of the day is a great birdie hole or a big number hole.
The fairway slopes to the left and is tough to hold.
OB does not really come into play off the tee shot. But an accurate second shot (which plays downhill) is needed to make birdie (on a relatively flat green).
Hole #4
- Blue 164 Yards
- White 154 Yards
- Red 120 Yards
Pro-Play:
This is a great par 3. It plays a club longer than the yardage.
But a shot hit over the green is almost impossible to get up and down for par.
The play is toward the left half of the green to avoid the large tree in front of the green. Grab par and go.
Hole #5
- Blue 190 Yards
- White 183 Yards
- Red 144 Yards
Pro-Play:
Back-to-back par 3’s. This one is long and uphill.
Play one extra club because of wind and slight elevation change.

Hole #6
- Blue 379 Yards
- White 362 Yards
- Red 317 Yards
Pro-Play:
This is my favorite hole.
The fairway has big Walnut trees at the 100 yard marker, on both sides, that can present a problem.
The play is to the left side of the fairway or even the rough. This angle will allow you to hit your approach shot against the massive right to left slope of the green.
Stay below the hole at all cost on your approach shot. Most of the time it would be better to pitch on from the front than putt down the slope.
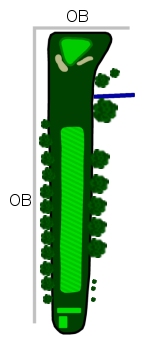
Hole #7
- Blue 322 Yards
- White 308 Yards
- Red 301 Yards
Pro-Play:
This is a true risk and reward hole.
There is OB left and long (roads) as well as a hazard on the right.
There is no need to hit driver unless you can get it close to the green.
The play is a low iron below the tree line (it will roll down the hill to nice wedge range)
The green slopes severely left to right, back to front.
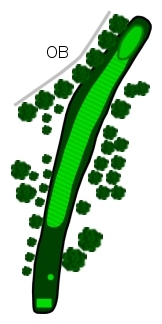
Hole #8
- Blue 321 Yards
- White 308 Yards
- Red 301 Yards
Pro-Play:
An uphill par 4.
The play is to the left side of the fairway, setting up a good angle to a long, narrow, left to right sloping green.The fairway slopes right also,so club up at least one club.
There is OB (road) left of the green.
Hole #9
- Blue 465 Yards
- White 441 Yards
- Red 427 Yards
Pro-Play:
A short uphill par 5.
The tee shot is of extreme importance. It would be better to be 50 yards back than out of position.
A miss to the right off of the tee will put you near the “elephant grave” which is difficult to navigate around.
Use at least 1 club extra on approach shots over 110 yards. Enjoy the relatively flat green.
This is the best chance for birdie.
All rates include tax
Location
1101 Wildwood Ln.
Nebraska City, NE 68410